You can have two (or more) versions of Windows installed side-by-side on the same PC and choose between them at boot time. The process for creating a dual-boot system is similar no matter what operating system you’re dual-booting with. Follow the step by step procedure below to successfully dual boot two or more versions of Windows in your system.
Getting Started
Install the First Version of Windows: First install the version of Windows you want normally. You may want to use custom partitioning settings and leave free space available on your hard drive for the second version of Windows. If you already have a single Windows system installed on your computer then that is enough.
Make Room For the Second Version of Windows: You will need available hard drive space for the next version of Windows. If you have Windows installed, you can resize the partition. You could also insert a second hard drive into your computer (if it’s going to be a desktop) and install the second version of Windows to that hard drive.
Install the Second Version of Windows: Now install the second version of Windows. Ensure you choose the “Custom Install” option, not the “Upgrade” option. Install it alongside the previous version of Windows, in a different partition on the same disk or on a different physical disk.
You will then be able to choose which copy of Windows you want to boot at boot time, and you can access the files from each version of Windows on the other one.
Note: Typically, you should install the newer operating system last. For example, if you want to dual-boot Windows 7 and 10, install Windows 7 and then install Windows 10 second.
Installing The First Version Of Windows (If It’s Not Already Installed)
If you have Windows already installed then it’s fine, but if your are installing Windows fresh then you will want to choose the “Custom install” option when going through the installation wizard and create a smaller partition for Windows. Leave enough space for the other version of Windows (This means you won’t have to resize partitions later).
Shrinking Your Windows Partition
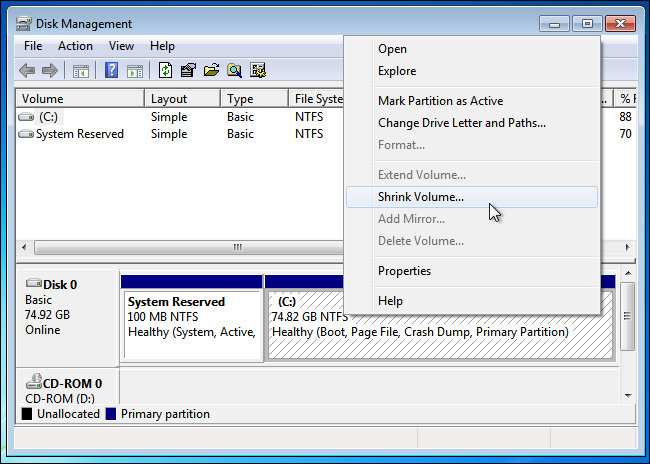
To make room for the second copy of Windows you will need to shrink your existing Windows partition. Basically, this involves booting the existing Windows system on your computer and opening the Disk Management tool. (Do this by pressing Windows Key + R, typing diskmgmt.msc into the Run dialog, and pressing Enter.) Right-click the Windows partition and select the “Shrink Volume” option. Shrink it to make enough space for the other Windows system.
Note: If you already have enough free space or you are installing the second copy of Windows to a different hard disk entirely and it has available space, you can skip this step.
If you are using BitLocker encryption on your Windows system, you will first need to open the BitLocker Control Panel and click the “Suspend Protection” link next to the partition you want to resize. This will disable BitLocker encrpytion until you next reboot. Now you will be able to resize the partition successfully.
Installing The Second Version Of Windows
Select the “unallocated space” and create a new partition on it. Tell Windows to install itself to this new partition. Be sure not to select the partition containing the version of Windows currently installed on your system (as two versions of Windows can’t be installed on the same partition).
When the installation is finished, you will see a boot menu every time you boot your computer. Use this menu to select the version of Windows you want to boot. Also you can customize the boot menu’s settings from within Windows itself. Open the Control Panel, click the System and Security option, click the System icon, and click Advanced System Settings at the left side of the window. Select the Advanced tab and click the Settings button under Startup & Recovery. You can choose the default operating system that boots automatically and select how long you have until it boots.
Note: If you want more operating systems installed, just install the additional operating systems on their own separate partitions.