
One thing that’s often missing in a home entertainment center is gaming. With the advent of Steam machines, it’s now possible to easily play PC games on your TV, but you have to shell out hundreds of dollars to buy one. Even though there are many media center software options for the Raspberry Pi, there’s not much for gaming. However, Iwan Timmer’s moonlight-embedded is one such program that can be used to build a Raspberry Pi Steam Box. You may be asking: “Can Raspberry Pi run Steam ?”. Currently it cannot, moonlight-embedded utilizes Nvidia’s open source game stream client, Moonlight, to stream games to Raspberry Pi, so it doesn’t install Steam on Raspberry Pi. Unfortunately, your PC will need a GPU with GameStream support, any Nvidia GPU from GTX 650 and up should work. For PC gamers, having Steam on Raspberry Pi makes playing on the big screen easy, and since most of the work is being done by your PC, your Raspberry Pi Steam Box can display games in 1080p, as long your internet connection is strong enough. Plus, with the new Raspberry Pi 3, you won’t even need to buy an external Wi-fi adapter.
How to build a Raspberry Pi Steam Box?
First you need to have all the required items to set up your Raspberry Pi Steam Box. I have listed everything you’ll need below.
- Raspberry Pi B+ or newer
- SD-card with latest version of Raspbian installed (should be Jessie)
- Wi-fi adapter (not need if your using Ethernet or the Raspberry Pi 3)
- Nvidia GPU with GameStream support (check Nvidia’s list of GPU’s for GameStream support)
- GeForce Experience 2.1.1 or higher on your PC
- HDMI cable to connect your Pi to a TV or monitor
- Peripherals for Pi such as a wireless HTPC keyboard
Preparing the Pi for Moonlight
This guide assumes you already have your Pi up and running, if you don’t then check out this guide to install an OS on your Raspberry Pi using NOOBS. There are some steps we need to take before installing moonlight-embedded on your Pi. First, we must add the repository that we will get moonlight-embedded from to the sources list. Open up the sources list with this line:
sudo nano /etc/apt/sources.list
After opening up sources.list, add the following line to the bottom:
deb http://archive.itimmer.nl/raspbian/moonlight jessie main
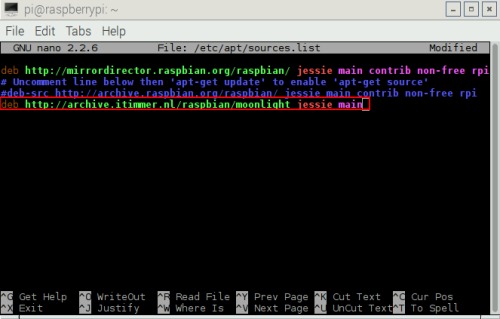
Press CTRL + X to save, choose Yes when prompted, and then press Enter. Now that the repository is added to the list, we have to update the sources so Raspbian can detect the changes:
sudo apt-get update
Installing and Setting up Moonlight
Now it’s time to install moonlight-embedded. Since we’ve already done most of the work, we can install it with this simple command:
sudo apt-get install moonlight-embedded
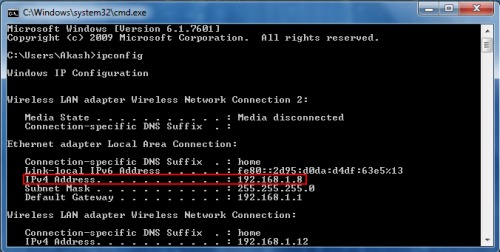
Make sure to press Y whenever prompted. Now that moonlight is installed, we have to pair the Raspberry Pi Steam Box to your PC. For this part, go back to your PC and open up a command prompt window, you can search for cmd.exe in the Start Menu to open command prompt, then type ipconfig into the window to open up your internet settings. Make sure to record the IPv4 Address as that is your local IP address, which we’ll need for pairing.
Now that you have your local IP address, go back to your Raspberry Pi and enter the following command, typing in your local IP address in place of the x’s:
moonlight pair X.X.X.X
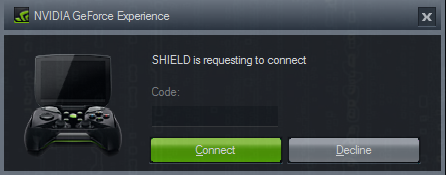
After entering this command, a four digit PIN will appear on the Pi’s console and a popup window will appear on your PC asking you to enter the PIN. Once you enter the PIN from the Pi into your PC, the two devices will be linked and you’ll have a working Raspberry Pi Steam Box. [Read: 10 best Kodi gaming addons you didn’t know about]
Using Moonlight
Now that Moonlight’s setup, it’s finally time to use your Raspberry Pi Steam Machine. The easiest way to use Moonlight is with the stream command:
moonlight stream X.X.X.X
Make sure to put your local IP in place of the x’s. This command will launch Steam in Big-Picture Mode on your PC and then stream that over to your Pi. With Steam on Raspberry Pi, you can stream pretty much any game on your computer. For non-Steam games, use the “Add a Non-Steam Game” option to link your games with Steam, then you can stream them to your Raspberry Pi through Moonlight. You can also use the -app option to stream a specific program. All the available options are listed below, when using options make sure that they’re in this format:
moonlight stream [options go here] X.X.X.X
What options can be used with Moonlight? Check the table below:
| AVAILABLE OPTIONS ON MOONLIGHT STREAM | EFFECT |
|---|---|
-720 |
Set resolution to 1280×720 [default] |
-1080 |
Set resolution to 1920×1080 |
-width X |
Set horizontal resolution to X |
-height X |
Set vertical resolution to X |
-30fps |
Set fps to 60 |
-60fps |
Use 60fps [default] |
-bitrate X |
Set bitrate to X [in Kbps] |
-packetsize X |
Set maximum packetsize to X [in bytes] |
-app X |
Stream X program |
-nosops |
Don’t allow GFE to modify game settings |
-input X |
Use X as input. Can be used multiple times |
-mapping X |
Use X as gamepad mapping configuration file (use before -input) |
-audio X |
Use X as ALSA audio output device (default sysdefault) |
-localaudio |
Play audio locally |