
Changing your DNS is a pretty common and good way to increase your privacy, safety and also increase internet speed, but it can be tiresome to open settings and switch it manually, or you could make a simple shortcut for it, her e it is how we can do it.
In this article, we are going to use a freeware tool from NirSoft, which is one of the only freeware tools that we can trust.
Downloading the Tool
if you are ready to begin, download QuickSetDNS tool from the Nirsoft’s official website. Just scroll to the bottom of the page and you can download the zip file which has an executable file. Once you have downloaded this program, create a folder on your desktop named QSDNS (or just wherever you want to put it), and then extract contents into this folder.
Launching and Using the QuickSetDNS
QSDNS is a standalone application so, there is no further installation required. Just open the file where you have extracted files and double-click on “QuickSetDNS.exe” file.
You can notice that this program indicates the way in which you connect to the Internet. In the image below, you can see what DNS settings are used.
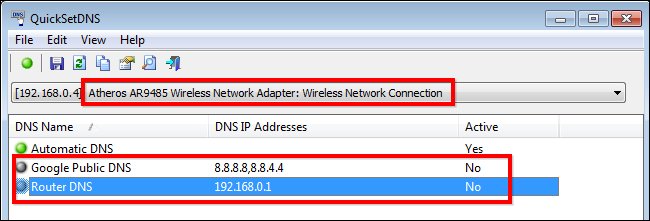
If you want to switch to an existing Google DNS server, you simply right click on the “Google Public DNS” option and then select “Set Active DNS.”

Adding A New DNS Server
If you want to use any other DNS server, like OpenDNS servers, the can add them to your list very easily. Start by pressing “Ctrl + N” to create new DNS server. Name the DNS and enter the OpenDNS IP addresses that is shown below then enact changes by selecting “OK.”
208.67.222.222, 208.67.220.220
After implementing the the changes, click on the new server and then press “F2” to make it active.
source: howtogeek