

Although technology is developed a lot, it can’t satisfy us always, such as importing photos from iPhone to Windows 10 directly. As the matter of fact, you can’t import photos from iPhone to Windows 10 for Windows 10 PC is not compatible with iPhone.
Then how can you import photos from iPhone to Windows 10 computer conveniently? Today, this post will show you one of the most practical methods – MobiKin Assistant for iOS to solve this problem with ease because this iPhone to Win 10 Transfer application can let you import all the photos selectively and manage your iOS data to iTunes or computer, which will shorten the transferring process very much.
Part 1: Highlighted Features and Advantages
First, it will introduce the highlighted features of MobiKin Assistant for iOS. Thus, you can learn about more of this useful app here:
- Transfer photos from iPhone to computer without iTunes;
- Besides photos, you can import contacts, call logs, text messages, notes (can’t be accessed in iOS 11), safari bookmarks, voice memos, calendars, apps, and so on from iPhone to Windows 10;
- It not only supports iPhone, but also works with iPad, iPod, like iPhone 11 Pro/iPhone 11/iPhone X/iPhone 8/iPhone 7, iPad Air, iPad Mini, iPad, iPod Touch, iPod nano 5/4/3, and more;
- Backup all the iOS files to the computer with 1-click feature;
- Restore the backup files from your computer to the iOS device in 1 click;
- View and select the data you want to import on the computer before the import;
- Uninstall the unwanted applications of the iOS device on the PC easily;
- Add new contacts, delete the needless phone numbers on the computer;
- Save files from iOS device as CSV, VCF, XML, TEXT, etc.;
- It is effective with Windows 10, Windows 8, Windows 7, Windows XP, and Windows Vista.
Part 2: How to Import Photos from iPhone to Windows 10 Selectively
Now, this part will let you know how to import the photos from your iPhone to the Windows 10 computer with MobiKin Assistant for iOS selectively, as long as you follow the simple steps as below:
Step 1: Download and Install MobiKin Assistant for iOS
From the beginning, you need to download the Photo Backup app on your Windows 10 computer. Then launch it directly.
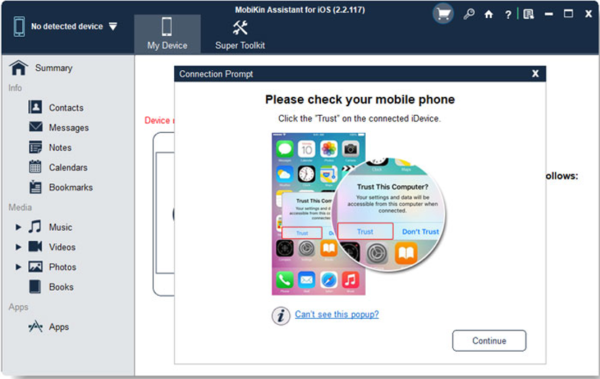
Step 2: Connect iPhone to PC
Next, please connect your iPhone to the PC with the iPhone USB cable. The software will detect your iDevice automatically. If prompted, tap on the “Trust” option on the iPhone.
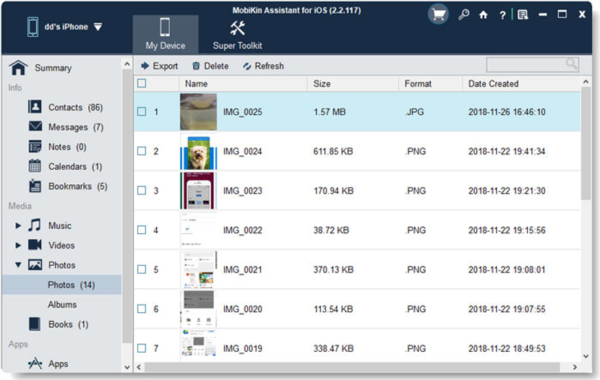
Step 3: Import Photos from iPhone to Windows 10
When connecting successfully, you will see the content of iPhone on the left panel and the detailed information of the phone is displayed on the right side.

On the screen, please click on the “Photos” category on the left, and the photos from your iPhone will show up on the right side of the screen. You can make a selection through ticking off the checkboxes next to the pictures. Finally, click the “Export” button on the upper and the app will begin to transfer the selected photos from iPhone to Windows 10 PC in no time.
Part 3: How to Transfer Pictures from iPhone to Windows 10 with Managing iTunes Backup
If you don’t want to import photos from iPhone to computer selectively, you can choose to transfer all the photos and other files from the iPhone to Windows 10 computer in 1 click as well. Besides, it can back up your iPhone to iTunes completely, which is exactly considerate. Let’s check the guide as follows:
Step 1: Enter the App
After downloading and installing MobiKin Assistant for iOS on the computer, please enter the app.
Step 2: Link iPhone to Windows 10 PC
Secondly, please link your iPhone to the Windows 10 PC with a USB cable. Then give the permission to the program to read your data.
Step 3: Back Up Photos to Windows 10 in 1 Click
Thirdly, go to the “Super Toolkit” tab on the upper, and then hit the “iTunes Backup &Restore” option. On the new page, please click the “Backup” button. Then choose your iOS device from the list.

Now, you can choose a location to save the data, including your photos. And you can also choose to backup files to default iTunes backup location. Tap on the “OK” button and the app will begin to back up your photos and other data to the place where you choose.

Final Thoughts
If you or your friends have no idea to import photos from iPhone to Windows 10 PC, you can get tips from this post. With MobiKin Assistant for iOS, you have two ways to import your pictures from iPhone and other iOS devices to the computer. And you will find how easy it is to transfer them and manage other kinds of data from your iPhone on the Windows 10 PC with a large screen. Give it a chance and it will satisfy you.