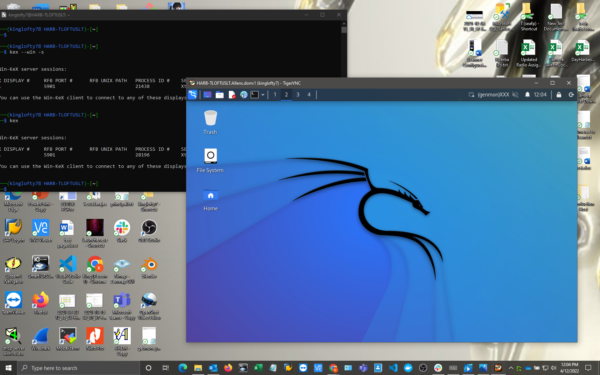
Anyone here tired of dual booting to get into your Kali machine? Or configuring VMware and V-Box to run with the latest tools? Stand-by for this one because I got you.
We’re going to install Kali Linux via WSL2 and then install a graphical user interface and some tools to go along with it. Buckle-up buttercups- this is going to be a fun ride. In my last post I showed you how to get WSL2 up and running- a video can be found here on YouTube. Now lets pick up where we left off.
Installing Kali
To start we want to head on over to the Microsoft Store and search for “Kali Linux” then get the download and install it. This is going to give us a basic install of Linux with just a shell to work from. We need to get some updates and install the tools required to start hacking. The first time you run it you will be prompted to create a username and password then run the following commands to get the latest updates and dependencies.
sudo apt update -y && sudo apt full-upgrade -y
This part should take about 10-15 mins, but the next part could take upwards of 1 hour to complete. Remember I said before you only get a basic install of Linux so the only tools installed are package handlers and basic commands. To get all the tools you require visit the Kali-Meta page on how to get them. You can choose from certain sets of tools or install them all. For the purpose of this walkthrough we will be installing the kali-linux-large metapackage- this will install all of the base applications included in Kali plus a few more.
sudo apt install -y kali-linux-large
Once that is finished running you have a full install ready to start hacking. That is, if you are a wizard with the command line. All of the tools will work without the next step- even the GUI applications like Legion will run. The next step shows how to get an actual desktop environment run in a windowed Kali machine on top of your Windows desktop.

Installing the GUI
Now that you have a full install its time to get the GUI. First shutdown the Kali instance and end it in task manager, then reboot your PC. Log back in and run the update command from before. It should return 0 updates available- or something along those lines. Next we need to the program that will run the GUI called Win-Kex. It is a Kali Desktop Environment for WSL2 and is an awesome tool to have. Install it with one simple command:
sudo apt install -y kali-win-kex
After you install Win-Kex you need to restart the Linux box, its not required but I like to reboot my PC after something like that any way to be safe. Now we can log back in to Kali and run the kex command with your preferred mode, Windowed, Session and Seamless. Running just the kex command starts windowed mode by default
Windowed
kex --win -s
Enhanced Session
kex --esm --ip -s
Seamless
kex --sl -s
Then voila!
Conclusion
This tool is by far one of the most useful tools that you can use with WSL2. You can use any tool included with ease and integrate VPN and Proxy info as well inside and outside of the Kali instance for extra security. You can also play around with metapackages in the Kali-meta page and have separate Kali instances if you integrate Docker. I going all the way with this one and giving it a 5/5 bunnies


Want to learn more about ethical hacking?
We have a networking hacking course that is of a similar level to OSCP, get an exclusive discount here
Help support LHN by buying a T-shirt or a mug?
Check out our selection here
Do you know of another GitHub related hacking tool?
Get in touch with us via the contact form if you would like us to look at any other GitHub ethical hacking tools.

